
Style the Charts on a PDF to Attach to the Weekly Email (Optional)
Back to: Automate Your Gravity Forms Reporting with GFChart and Gravity PDF
License Note
Gravity PDF is available for free in the WordPress Plugin Directory. To use the templates for GFChart, you’ll need to purchase at least a Single License for the GFChart templates.
Once your report is delivering reliably, you can add style to your report with the help of business reports from Gravity PDF. Browse the templates available from Gravity PDF, made specifically for use with GFChart.
To set up your PDF, go to the Settings of the form that automates your report delivery. Choose PDF from the menu.
Click Add New and give your report a label. If you plan to test multiple templates, it is helpful to include the description in this label (e.g. 4 charts with background picture).
Next, choose your template (you can see all the options on this Gravity PDF page). I chose GFChart Maxwell (Stylized Alt) as the PDF template for my report.
Choose your notification options, determining which notification email to attach the PDF to (if you have multiple). There are instructions on password protecting the PDF and using the [gravitypdf] shortcode to embed the PDF directly in your notification email (rather than adding it as an attachment).
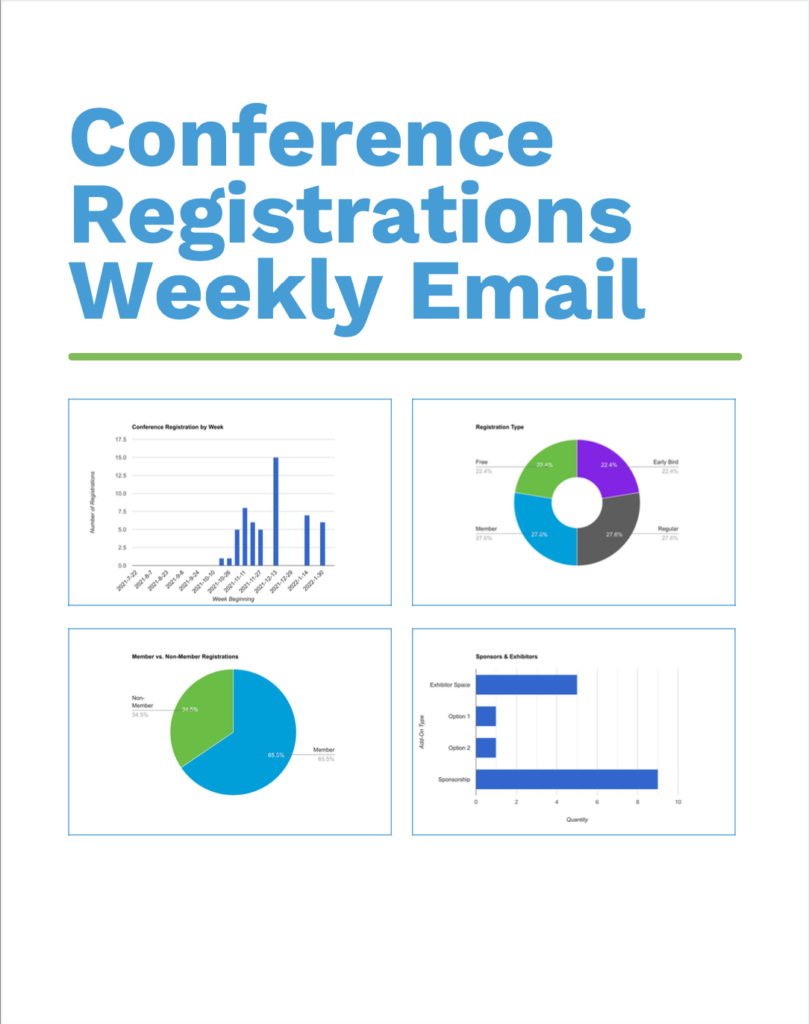
Next, set a Filename for the PDF. You can use merge tags in this title including the date at the time the email is sent. I called mine “Weekly Conference Stats as of {date_mdy}”.
Determine whether to use Conditional Logic to direct the delivery of this report.
In the next box, set the appearance of the report by choosing the paper size and orientation and the font style, color and size.
Next, set up your report in the template you selected by filling in the boxes available. This is where testing can really come in handy to check what the report looks like.
I set the Main Heading to {form_title}, added my four charts from the dropdown menus and chose my preferred colors. You have the option to add text in several different spots depending on your needs.
Once you have filled in everything to the best of your ability, click “Add PDF” to save the PDF file and test it.
You can test the delivery two ways:
- Preview the form and submit a test entry, which will trigger the notification
- Go to Tools > Cron Events in the Admin menu, find the scheduled notification and click Run Now
Continuing tweaking and testing until the PDF is just how you want it.